
As I couldn't get Peggers to pose for any pictures, and I do want to get these knitted and off of my needles (and off myTo-Knit list!) I decided that I'd simply have to self-model them myself.
Now bear in mind that one of the reasons that I'm frogging these is because they're too long on my 6'4" husband......................and I'm only 5'7". So consider that extra length AND difference in proportions when you see them on my own (shockingly-pale) leg!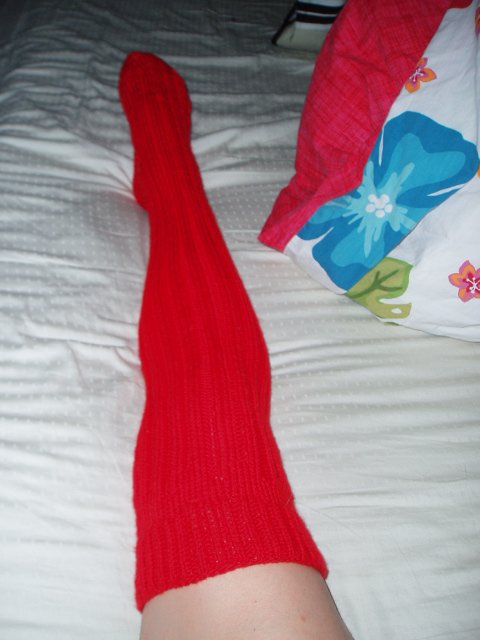
(I have to say that this yarn - KnitPick's Swiss Superwash - really is VERY soft. It feels lovely as a sock - it would be sheer heaven as a sweater.)
The pattern I used for these was straight from EZ & her Knitting Without Tears (which I was able to effortlessly get from my Inter-Library Loan department at work) and knitted up as quick as quick can be. Knit at a gauge of only 5 or 6 stitches per inch I cast on 74 stitches for the ribbed cuff (K1P1) and knit that for about 2 inches. Then I decreased straight down in one single round to 64 stitches, knit at that rate for about 6 or 7 rounds, and then started gradually decreasing for the calf, tapering it every four rounds until only 58 stitches remained.
I did a vaguely fancy thing with the ribbing for the main body of the sock (and note that I say vaguely fancy, meaning that it is something that all other normal proficient knitters would do in their sleep without even realizing it, but it was something that I thought about and debated before trying out....) - instead of jumping from the K1P1 ribbing of the cuff to the K2P2 ribbing of the main sock I instead did a little segue way into the main sock ribbing that resulted in it looking something like this: I know - not at all fancy for most folks, but still pretty satisfying for me to plan out and then actually LIKE the way it looks. And when I showed it to Peggers? LOL. He just nodded his head & said "yup" and motioned for me to keep on knitting!
So I knit for what seemed like FOREVER (about 16-18" actually) and then after several fittings (and {ahem!}I must say, after my husband said those fatal words "It can't be too long of a sock, honey!") decided that it was finally time to start doing the whole slipped-stitches thing for the top of the foot. For, you see, the sock is made in true EZ fashion - which is to say utterly bizarre when you're knitting it up and absolutely brilliant once it's finished!
So you put about 8 or so stitches (the heel stitches, ultimately) on a holder and then keep knitting for the rest of the foot, slipping the first and last as you go until the foot is about two inches from where you want it to end. After you've done that you go back and pick up all along that slipped-stitch edge, pick up the stitches on the holder, and then pick up along the second slipped-stitch side, and then start knitting in the round for what turns out to be a really bizarre shaped yet totally sensible foot.
Now mind you the foot doesn't look too bizarrely-shaped here (but OH! Those holes!!!) but that's because it's stretched out on my foot - which is where, incidentally, EZ's genius comes into play. But see what it looks like when it's NOT stretched out on a foot?????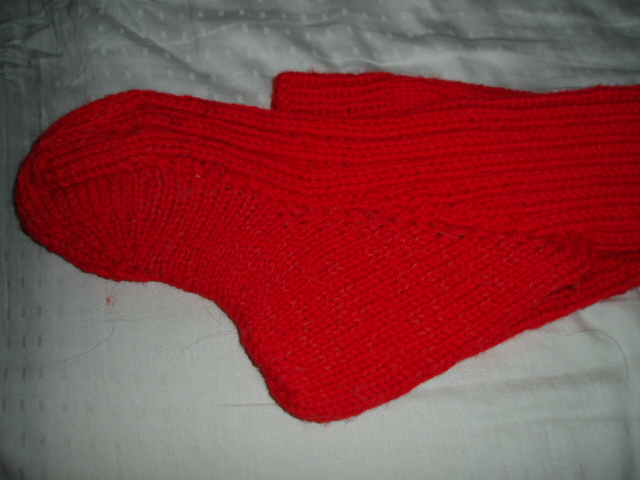
I mean, whose heel is ever THAT pointy and whose foot ever......oozes (for lack of a better word) down that far??? See? EZ was just a wee bit mad and more than a wee bit brilliant, I'm thinking......
Anyway, you knit for a bit just in the heel area (short rows) and then you knit halfway around until you're at the toe area and then you knit for a bit just in the toe region (again, short rows) and then once you're done with that you knit all the way around several times, do a decrease row, etc. until you've only got a few stitches left. Now this is the only place where EZ failed me where I failed EZ - I did the decreasing exactly as it said (& in her usual way the instructions were pretty vague) and when it came time to thread all of the remaining stitches together & pull the yarn tightly & weave in the end I realized that I was left with - oh - 30+ stitches and that this meant that Peggers was going to have himself a VERY uncomfortable pair of fire-engine red knee-highs unless I did some quick decreasing - so I decreased exponentially in another round or so and then was left with 7 or stitches to pull tight and weave in the end for. It looked bizarre but it worked, and that's what matters in the long run. Because uncomfortable socks just Don't Get Worn.....and I'll be damned if I'm doing all of this knitting for something that isn't going to be worn!
(Oh, and somewhere in there around the toe - as instructed - I started knitting with both the Swish & with a strand of Wooly Nylon that I got to help things stay sturdy & shapely. My first W.N. choice - a deep merlot red - oddly enough showed up when stretched & knitted as grape popsicle purple. So my second choice of W.N. - a rusty orange - actually worked out much better - that was more of a pale red when stretched & carried along with my working yarn.....)
I stayed up until 1-ish in the morning to finish these, I was so excited to be *so*close* - and was quite crushed, actually, when I realized that they were too long on Pegger's leg. Drat! However I have since recovered (nothing like a few Very Satisfying Finished Objects to smooth over one's ruffled feathers, huh?) and have realized that in fact this was probably all for the best. After all it's always on the SECOND item that you work out all of the snafu's that you knitted in the first! So that means that I:
* need to figure out how to eliminate those holes along the entire freaking foot from where I picked up all of those slipped stitches. I knit into the back of the stitches and EVERYTHING to avoid the holes - which obviously didn't work (but makes me shudder to think of the absolute caverns that I would have ended up with if I hadn't twisted the stitches!) - so I need to come up with a second plan.
* need to decrease faster & more (Kate, please forgive me for causing you such pain, as that's horrid horrid horrid grammar, I know - bear with me as it's a Friday afternoon & the Munchkin woke up this morning AGAIN at 5 AM and it's just the best that I'm currently capable of) so that I'm not left with 30+ funky stitches and nowhere to go with them except a big bunching mass of them right under the arch of the foot.
* I also need to make the foot longer - bizarrely enough - it's far too big for my foot (duh!) but on P's size thirteen feet the sock is stretched too much around the toe region and so that needs to be longer. So what I might do is slip this sucker on his (sleeping) leg tonight once he's asleep and then measure & scribble as needs be - so that while he's gone this weekend I can get started {sniffle, sniffle, sniffle} ripping out ALL of that knitting and re-knitting all of those twisty miles of sock over again. Properly. Both longer and shorter - and all at once...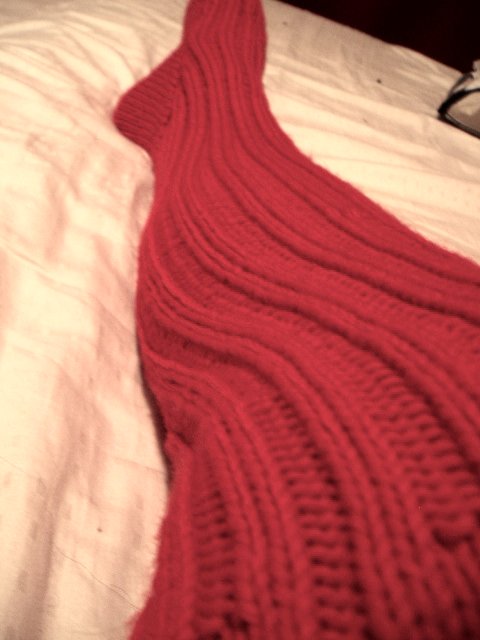
Friday, November 03, 2006
Post 2: Huge-mongous Red Knee-High Socks
Subscribe to:
Post Comments (Atom)

2 comments:
Okay, the comments are doing weird things again; it won't let me comment on the second repeat of this post, but I'm hoping it'll work here.
*Anyway*. Bad grammar is fine - if you're using it on purpose and for effect! It's all about intent. So all is well. Phew. (Convenient little notion, isn't it? It's sort of like the old saw, "it's not a mistake - it's a design element!")
I LOVE the sock and totally don't understand why you have to rip the whole thing??! Can't you just rip up to the ankle or something?
I also love the wacky thing you did with the ribbing. I've never seen it before, or thought of it, and I'm impressed! All of knitting is just permutations of simple things anyway, so don't sell yourself short on that little invention!
I had the holes, too, and still haven't solved the problem, so I'm calling it a design element. I actually do kind of like them, because it highlights the wacky, unexpected construction. That said, I do intend to experiment with ways to eliminate them, as it's also nice to know how to make hole-less socks when you want to, n'est-pas?
You know what's funny - I got my instructions from Knitting Around, and I think the way she says to do the sole there is rather different. Short rows only for the heel, then an inch or so plain around, then 12 decreases all in a row at the toe end, a few more rows, then more decreases at tow and heel "to round them," then you graft together a seam all along the length of the sole. But, in the end, you get exactly the same insanely weird shape you got, which somehow magically fits the human foot just right. Classic EZ, indeed.
I also noticed that the instructions for the same sock in Almanac has you making the leg back-and-forth on straight needles, then later seaming them (!). It seems like her formula evolved from book to book...
I think the sock looks really good. Amazing, in fact! You did a nice job with the fancy ribbing and it's very impressive that you're willing to rip out the whole thing and start over...the mere thought would be enough for me to cast the project aside for a couple of weeks. (You want him to wear them this sporting season, I know, but still...) I agree that you should try to rip out just a little first and see if you can save yourself all that re-knitting!
By the way, I'm using the same yarn for a baby blanket and it's sooo soft! I love it and plan on using it for other projects. Socks are up soon (I bought the yarn and a pattern--much simpler than your knee-highs!--last week) so your tips are much appreciated. :)
Post a Comment